The age of the floppy disk might have come and gone but the format still has its uses…
3.5″ 1.44MB floppy disks can still be had. An Amazon search performed at the time of this writing returned pages of results. However they appear to have gone back up in price, with the least expensive offering coming in between $1.50 – $2 per disk. There are probably some niche users out there. I’ve personally seen them used in CNC Machines and some really impressive sewing machines that I suspect do similar jobs with different materials.
But this post is about virtual floppy disks. It turns out the virtual floppy is a really handy way to get a kickstart file over to the installer on a newly provisioned virtual machine if you’d rather not bother with firing up an FTP server, or creating an .iso.
I’m currently working with KVM on Fedora where I have a fresh install of CentOS 7.6 (1810). For the purposes of this demonstration I will be taking the kickstart file left behind in that installation and use it to complete a new installation on the same KVM server.
Step 1. Obtain the Kickstart File
Every time you perform a new installation of Fedora/CentOS/RedHat, a kickstart file which records all the manual choices you made while performing the installation is created and stored in the root user’s home directory as anaconda-ks.cfg. I’ll be creating my floppy image on the Fedora desktop that also serves as my KVM server so I need to get the kickstarter file from the VM over to my desktop. Openssh-Clients is installed by default in both places so I know I will be able to sftp the file between them.
        $ sftp root@CentosVM
        > get anaconda-ks.cfg
Step 2. Create the Floppy Image
A floppy image is a lot like an iso image of an optical medium. Just like an iso, a floppy image can be mounted with the -o loop option to inspect and work with its contents. Create the image like this:
$ mkfs.msdos -C ~/fdimage.img 1440Contrats, you now have a fat formated 1.44MB floppy disk image called fdimage.img in your home directory. Let’s put the kickstart file on the floppy image.
Step 3. Transfer the Kickstart File to the Floppy Image
First, to save some typing later on I’ll rename the Kickstart file to just ks.cfg:
$ mv ~/anaconda-ks.cfg ks.cfgNow, I’ll mount the floppy at /media on my Fedora machine’s filesystem:
$ sudo mount -o loop ~/fdimage.img /mediaThen, with sudo, I’ll copy the ks.cfg Kickstart file to /media and unmount the floppy image:
        $ sudo cp ~/ks.cfg /media
        $ sudo umount /media
Step 4: VM Installation
We will be installing a new VM on KVM in the usual way with one twist. Since a floppy drive usually isn’t added to the hardware list, we’ll have to add it manually. This usually interrupts the standard VM install workflow since KVM’s new installation wizard wants to dump us right into installation without allowing us to install new hardware first. So, rather than doing the usual Next > Next > GO! watch carefully for a checkbox on the wizard’s step five that allows us to do some pre-install hardware config:

Now use the ADD HARDWARE button to add Storage with the device type of floppy device:

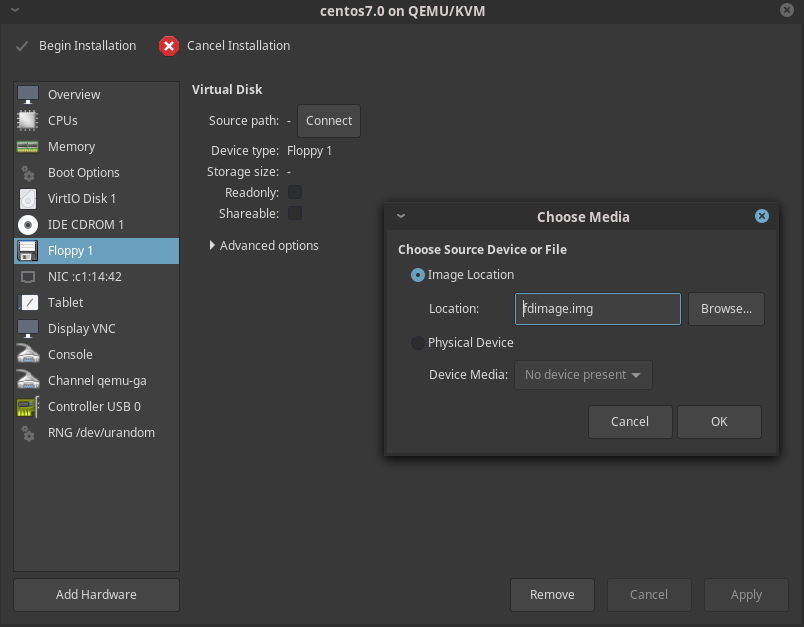
Finally, insert the virtual floppy into the virtual floppy drive (people my age will imagine a satisfying THUNK) by choosing your floppy drive from the hardware list along the left hand side and clicking the CONNECT button and browsing to your home directory and choosing the fdimage.img file we created and prepared in steps 2 and 3:
Step 5: OS Installation
With the floppy containing the Kickstart file inserted into the virtual floppy drive we’re able to begin OS installation. Click Begin Installation at the upper left hand corner of the wizard and we’re off to the races. As soon as you see the familiar CentOS install screen you’ll want to press the TAB key to interrupt the boot process to modify the kernel command line to point to the kickstart file.
Append the following line to the kernel command line to have the installer check the floppy drive for a kickstart file:
linux ks=floppy:/ks.cfgThen press [Enter].
Once the installation is underway, you’ll see the invisible hand of kickstart clicking through the options from your previous install leaving you with a new identical virtual machine.
I’ll agree, in this case, we could have just as easily cloned our existing OS, but consider a situation where you might need to install dozens or hundreds of identical and carefully customized virtual machines. In a scenario like this, the automation via Kickstart could save you days of work.
